· How Workout Director is built, part 2
Drawing exercise figures from code
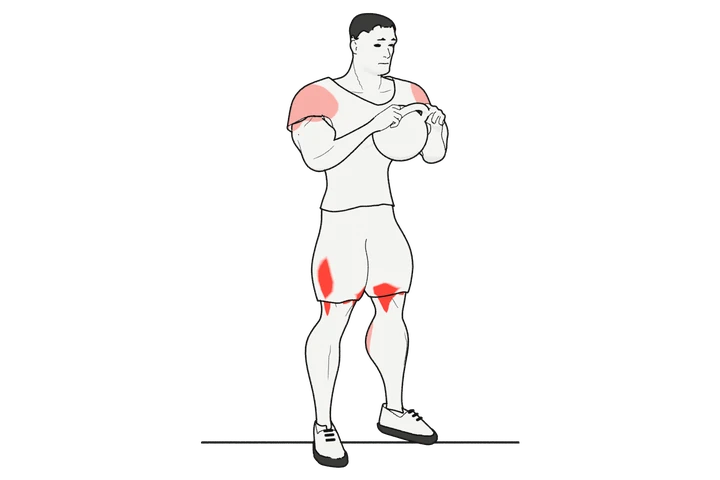
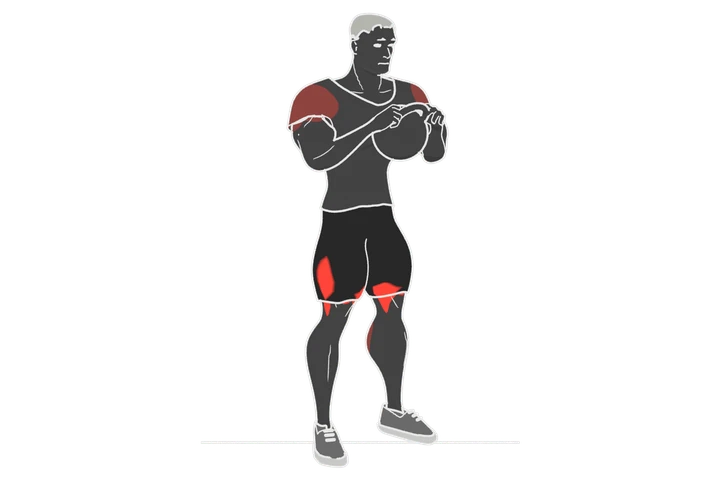
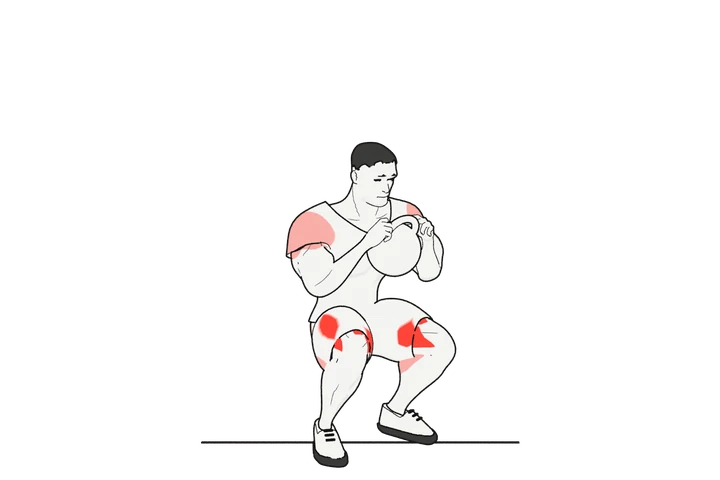
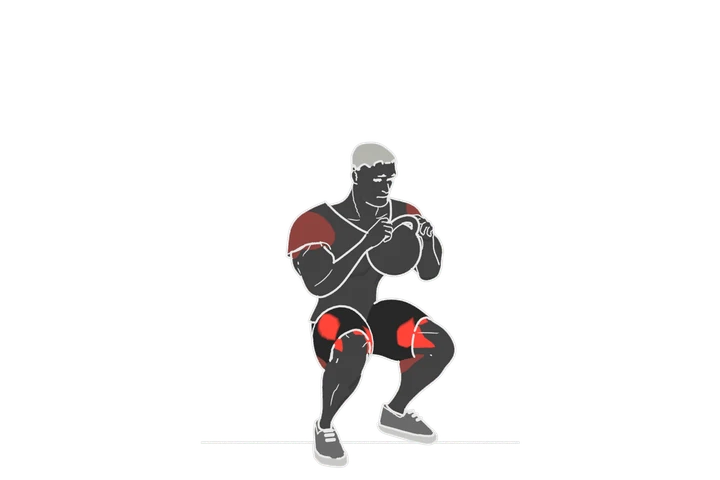
Each exercise in Workout Director has a small figure: a start pose and an end pose, with the working muscles tinted. I didn't draw them by hand. They are 3D renders of one rigged human body, posed from a written spec and drawn as line art in Blender, and scripts check each one against measurements from reference images before it goes into the app.
This note covers how that works: where the body comes from, how a pose is written and measured, how the line art is made, and the checks that decide whether a figure ships.
Why not use existing drawings
The open exercise drawings I could find didn't fit. The best-known set of line drawings is licensed CC BY-SA, so anything adapted from it would have to carry the same licence. Stock illustration sets don't share one style or one body, and they rarely have a matching start and end pose for the same move.
I wanted one consistent figure across every move, light and dark versions, and a licence that was clean all the way down. So the rule became: build the figure from openly licensed parts, and use photos only to measure poses.
The pieces
- The body. The base mesh and the shape targets come from MakeHuman's MPFB2 data, and the 163-bone default rig and its weights from MakeHuman itself. All of it is CC0. The script builds the body directly from those files, so no Blender add-on is needed. Targets push it towards an athletic build, and corrective shape keys keep elbows and knees from collapsing when they bend.
- Clothes. Shorts, a t-shirt and trainers are real cut geometry, so hems and collars draw as clean lines instead of texture.
- Equipment. Dumbbells, barbells and plates, kettlebells, benches and machines are built in code at real-world sizes.
- Reference images. Photos from free-exercise-db (public domain, under the Unlicense) show the start and end of each move. Where a photo was a front view or didn't show good form, I also compared the pose with frames from exercise demo videos, and only the measurements went into the checks.
- Rendering. Blender 4.2 in the background, Cycles on the CPU with flat emission shading, and Freestyle for the lines. Each still takes a few seconds.
From a reference image to targets
A pose estimator doesn't draw the figure. It measures the reference. For each move I pick start and end reference images, and MediaPipe's Pose Landmarker reads joints from them: 2D keypoints in image pixels, and 3D "world" landmarks in metres, centred on the hips.
from mediapipe.tasks.python import vision, BaseOptions
import mediapipe as mp

# Landmark indices from the MediaPipe pose model, renamed to the rig's sides.
NAMES = {11: 'shoulder.L', 12: 'shoulder.R', 13: 'elbow.L', 14: 'elbow.R',
         15: 'wrist.L', 16: 'wrist.R', 23: 'hip.L', 24: 'hip.R',
         25: 'knee.L', 26: 'knee.R', 27: 'ankle.L', 28: 'ankle.R'}  # and a few more

options = vision.PoseLandmarkerOptions(
    base_options=BaseOptions(model_asset_path='pose_landmarker_heavy.task'))
detector = vision.PoseLandmarker.create_from_options(options)

def landmarks(path):
    image = mp.Image.create_from_file(path)
    result = detector.detect(image)
    if not result.pose_landmarks:
        return None
    screen, world = result.pose_landmarks[0], result.pose_world_landmarks[0]
    keypoints = {n: (screen[i].x * image.width, screen[i].y * image.height, screen[i].visibility)
                 for i, n in NAMES.items()}
    return keypoints, world
This runs offline on my machine, so it uses Heavy, the largest of the three public pose models. The app runs BlazePose Full on the phone, which is a story for the next note.
The world landmarks become targets: joint angles and spacing ratios that don't depend on where the camera was. The angle at a joint is the angle between the two segments that meet there, and spacing is measured against shoulder width, so it doesn't depend on the size of the person in the picture.
import math
import numpy as np

def angle(a, b, c):
    """Angle at b, in degrees, between b->a and b->c."""
    u, v = a - b, c - b
    cos = u @ v / (np.linalg.norm(u) * np.linalg.norm(v) + 1e-9)
    return math.degrees(math.acos(np.clip(cos, -1, 1)))

def targets(P):
    """P: joint name -> 3D point in a z-up frame. Returns the measures a figure is judged on."""
    t = {}
    for s in 'LR':
        j = lambda name: P[f'{name}.{s}']
        t[f'elbow.{s}'] = angle(j('shoulder'), j('elbow'), j('wrist'))
        t[f'hip.{s}'] = angle(j('shoulder'), j('hip'), j('knee'))
        t[f'knee.{s}'] = angle(j('hip'), j('knee'), j('ankle'))
    shoulders = np.linalg.norm(P['shoulder.L'] - P['shoulder.R'])
    t['wrist_spacing'] = np.linalg.norm(P['wrist.L'] - P['wrist.R']) / shoulders
    trunk = (P['shoulder.L'] + P['shoulder.R']) / 2 - (P['hip.L'] + P['hip.R']) / 2
    t['trunk_from_vertical'] = angle(trunk, np.zeros(3), np.array([0, 0, 1.0]))
    return t
Each move takes the median over several reference images, so one odd frame doesn't set the target. The 2D keypoints are kept too, for the checks further down and for a solver that tries variations of a spec and ranks them against the targets.
From a spec to a pose
The pose itself comes from a spec: a JSON file per move that says where each bone points, where the feet and hands go, the grip, the muscles to tint, the equipment, the outfit and the camera. A rig doesn't want positions, it wants rotations, but writing rotations by hand is error-prone. So the spec uses directions instead: the thigh points this way, the shin that way.
{
  "aims": { "spine03": [0, -0.1, 1], "upperleg01.L": [0.2, -0.7, -0.7] },
  "legs": { "L": { "pole": [0, -1, 0] }, "R": { "pole": [0, -1, 0] } },
  "arms": { "L": { "wrist_target": [0.15, -0.25, 1.35] } }
}
The numbers above are made up for the example. A real spec has more keys and a few per-move overrides.
Aiming bones, and IK where something is fixed
Aiming a bone is a rotation from where it points now to where the spec says it should point. The one subtlety is twist: a direction says nothing about how far the bone is rolled around its own axis, so a bone can also carry a reference vector. That keeps the biceps facing forward instead of at a random roll.
def aim(rig, bone, direction, ref=None, ref_to=None):
    """Point `bone` along `direction`. Optionally roll it so the rest-space vector `ref` faces `ref_to`."""
    pose_bone = rig.pose.bones[bone]
    current = pose_bone.matrix.to_3x3()
    now = (pose_bone.tail - pose_bone.head).normalized()
    goal = Vector(direction).normalized()
    R = now.rotation_difference(goal).to_matrix()
    if ref is not None:
        carried = R @ (current @ rest_inverse(rig, bone) @ Vector(ref))
        a = carried - goal * carried.dot(goal)          # both vectors flattened
        b = Vector(ref_to) - goal * Vector(ref_to).dot(goal)  # onto the bone's plane
        R = Quaternion(goal, signed_angle(a, b, goal)).to_matrix() @ R
    set_rotation(rig, bone, R @ current)
Where a limb has to end at a known point, such as feet flat on the floor or hands on a bar, directions alone aren't enough, because small errors add up along the chain. Those limbs use analytic two-bone IK. Given the two bone lengths and the target, the law of cosines gives the joint position, and a pole vector says which way the knee or elbow bends:
def two_bone_ik(root, joint, end, target, pole):
    """Place `joint` so root -> joint -> end reaches `target`. Returns the new joint and end."""
    upper = (joint - root).length
    lower = (end - joint).length
    to_target = target - root
    reach = min(to_target.length, (upper + lower) * 0.9995)   # never fully straight
    d = to_target.normalized()
    cos_a = (upper**2 + reach**2 - lower**2) / (2 * upper * reach)
    cos_a = max(-1.0, min(1.0, cos_a))
    bend = (pole - d * pole.dot(d)).normalized()               # pole, flattened against the reach
    new_joint = root + d * (upper * cos_a) + bend * (upper * (1 - cos_a**2) ** 0.5)
    return new_joint, root + d * reach
Grip is its own small solver. It seats the handle in the base of the fingers, curls each finger joint until the skin touches the shaft, curls the thumb the other way round, then backs off until no part of the hand is inside the handle.
Tinting the muscles
The muscles are not separate meshes. Each one is a soft region on the skin of the rest-pose body, computed per vertex and then painted as a mask. For a limb muscle, the region is a window along a bone (from some share of its length to another), times an angular sector around it (front of the arm for the biceps, back for the triceps), with a bulge in the middle so it reads like a muscle belly rather than a band.
def smoothstep(x, a, b):
    t = max(0.0, min(1.0, (x - a) / (b - a)))
    return t * t * (3 - 2 * t)

def limb_region(vertex, bone_head, bone_tail, facing, half_angle, start, end, soft):
    """0..1 weight for one vertex: a window along the bone x a sector around it."""
    axis = bone_tail - bone_head
    length = axis.length
    axis.normalize()
    offset = vertex - bone_head
    along = offset.dot(axis) / length                  # 0 at the head, 1 at the tail
    radial = offset - axis * offset.dot(axis)
    u = (along - start) / (end - start)
    if not 0 < u < 1 or radial.length < 1e-6:
        return 0.0
    belly = math.sin(math.pi * u) ** 0.5               # widest in the middle
    angle = math.degrees(radial.angle(facing - axis * facing.dot(axis)))
    return 1 - smoothstep(angle, half_angle * belly - soft, half_angle * belly + soft)
The real regions have more rules than this: torso muscles use boxes filtered by surface normal, large groups are split into their heads with a groove between them, a secondary muscle never paints over a primary one, and a few regions are clipped where a tint was spilling onto the wrong skin. The values in the excerpt are placeholders, not the ones I use.
A theme turns the weights into colours for the light and dark versions. In the app, the primary muscles are coral, the app's accent colour, and secondary muscles get a softer mix of it.
Line art
The figures are flat. Shading is a two-tone ramp from a fixed key light, so the tint colours stay clean, and the drawing is done by Freestyle, Blender's line renderer. Freestyle sorts edges into types (outer contour, silhouette, crease, border, marked edges), and each "line set" picks some types and gives them a weight.
def lineset(view_layer, name, thickness, **edge_types):
    ls = view_layer.freestyle_settings.linesets.new(name)
    ls.select_by_visibility = True
    ls.visibility = 'VISIBLE'
    for kind in ('silhouette', 'border', 'crease', 'contour', 'external_contour', 'edge_mark'):
        setattr(ls, 'select_' + kind, edge_types.get(kind, False))
    style = ls.linestyle
    style.thickness = thickness
    style.caps = 'ROUND'
    return ls

lineset(layer, 'outer', base * OUTER, external_contour=True)        # heavier outline
lineset(layer, 'inner', base, silhouette=True, crease=True, border=True)
form = lineset(layer, 'form', base * FORM, edge_mark=True)           # muscle separations
# form lines are lighter and taper at both ends (an along-stroke thickness curve)
The few anatomical lines that an illustrator would draw, such as the edge of the deltoid, the line down the abs or the split of the calf, are plane cuts on the mesh. That gives clean edge loops to mark for Freestyle, and the cut is pushed in by a couple of millimetres so the silhouette picks it up too.
Two problems took longer than I expected:
- Lines under clothes. Freestyle's visibility test is unreliable when a garment sits a few millimetres off the skin, so body lines showed through the shirt. The fix was to remove body edge marks wherever a garment covers the same rest-pose vertices, found with a KD-tree on a copy of the garment.
- Lines that pop between frames. In an experimental bench press animation, the outline of the near arm briefly disappeared for a frame or two. Rendering one line set at a time showed why: at that pose the edge of the bar lay exactly on the arm's outline, so two strokes merged into one. I tried a render option that draws a background-coloured halo under the equipment outlines, but it is experimental, off by default and only set up for the bench, and its render still failed the flicker check. This one isn't solved yet. The app only uses still start and end figures, so it doesn't show this.
Checks before a figure ships
A figure that looks fine at a glance can still be wrong: a knee bent the wrong way, a shoe slightly under the floor, a thumb through the bar, or a pose that matches the reference but not good form. So every figure goes through a set of scripted checks, and it doesn't go into the app until they all pass.
- Joint angles against the reference. The rig's exact 3D joints are projected into a "judge view" that best lines them up with the reference image's keypoints, and the 2D joint angles are compared. The 3D targets from the world landmarks are checked as well.
- Form over the reference. Reference images are sometimes not textbook: a model looks down during a lunge, or the hips are already up at the start of a bridge. Where that happens the joint is judged against a textbook range for the move instead, with a note in the code saying why.
- Physics and equipment. Nothing sinks into the floor or the bench, nothing passes through itself or the equipment, the bar is level, plates are symmetric, and equipment is the right size.
- Grip. No fingers through the handle, no gap between palm and handle, thumb wrapped, knuckles along the bar, wrist neutral.
- MediaPipe on the render. The finished figure is run back through the pose model, on several backgrounds and crops, and compared with the reference images using measures that don't depend on the view: ankle angle, which way the foot points, where the hands sit along the body, segment angles to the trunk. If a pose model can't read the drawing as the same pose, a person might not either.
- Animation. The app ships still start and end figures, not animations. The experimental animated versions get extra checks: no foot sliding, constant bone lengths, no velocity spikes, a seamless loop and no line flicker between frames.
Changes to shared code are checked against figures that have already shipped: the figures are re-rendered and compared, so a fix for one move can't quietly change another.
Making the checks cheap enough to run every time
The checks only help if they run on every change, and at first a single move could take minutes. Profiling showed most of the time went into Blender re-evaluating the deformed meshes (armature, subdivision, cloth fixes) after every IK step, and the grip solver made it worse by trying many thumb positions, each with a full update.
The fix was to switch the mesh modifiers off while bones are being solved and turn them back on at the first point where something reads the deformed mesh. Joints and animation samples came out identical to the old path. A bent-over row went from about six minutes to under a minute. After that, pose-only checks run before anything is rendered, so a pose that fails never costs a render, and spec variants can be solved in parallel and ranked.
In the app
A figure pack is an asset catalog: one image set per pose, each with light and dark appearances at @2x and @3x, on a transparent background. Start and end share one crop, so the two poses line up exactly.
On the Swift side there is a small lookup from the exercise name to the image set names. Names are matched in lower case, and ids written with underscores resolve too:
/// Our own exercise figures in ExerciseFigures.xcassets: a start and an end pose,
/// light and dark. A hold has one pose.
struct ExerciseFigure: Equatable {
    let start: String
    let end: String

    /// One pose, nothing to move between.
    var isHold: Bool { start == end }

    private static let byName: [String: ExerciseFigure] = {
        let goblet = ExerciseFigure(start: "ExerciseFigureGobletSquatStart",
                                    end: "ExerciseFigureGobletSquatEnd")
        let plank = ExerciseFigure(start: "ExerciseFigurePlankStart",
                                   end: "ExerciseFigurePlankStart")
        // ...
        return [
            "goblet squat": goblet,
            "kettlebell goblet squat": goblet,
            "plank": plank,
        ]
    }()

    static func of(_ move: String) -> ExerciseFigure? {
        byName[move.replacingOccurrences(of: "_", with: " ")
            .trimmingCharacters(in: .whitespacesAndNewlines).lowercased()]
    }
}
A figure is used only for the exact move it shows. A dumbbell curl figure isn't reused for a barbell curl, and a barbell row isn't reused for an inverted row. A move without a figure shows a plain fallback instead of a near match.
What I would do the same way again
- Keep the licence clean from the start. A CC0 body, reference images used only for measuring, and my own renders in the app. It made the question "can I ship this?" easy to answer for every image.
- Pose with directions, and judge with angles. Specs written as bone directions are easy to read and to fix one bone at a time. Joint angles measured from references are easy to compare. Keeping the two apart meant a figure was never a copy of one image.
- Write the checks before trusting the renders. Most of the problems they caught were ones I wouldn't have noticed on a phone screen until a user did.
Two things I looked at and haven't adopted yet: Blender's Line Art modifier, which handles lines near touching surfaces better than Freestyle but needs an OpenGL context that my headless render machine doesn't have, and a parametric body model built on the same MakeHuman topology that can be fitted to an image directly, instead of writing bone directions by hand.
Next in the series is part 3, on choosing a pose model for the phone.
Workout Director is published on the App Store by Shelgaon Ltd. App Store · workoutdirector.com · Case study